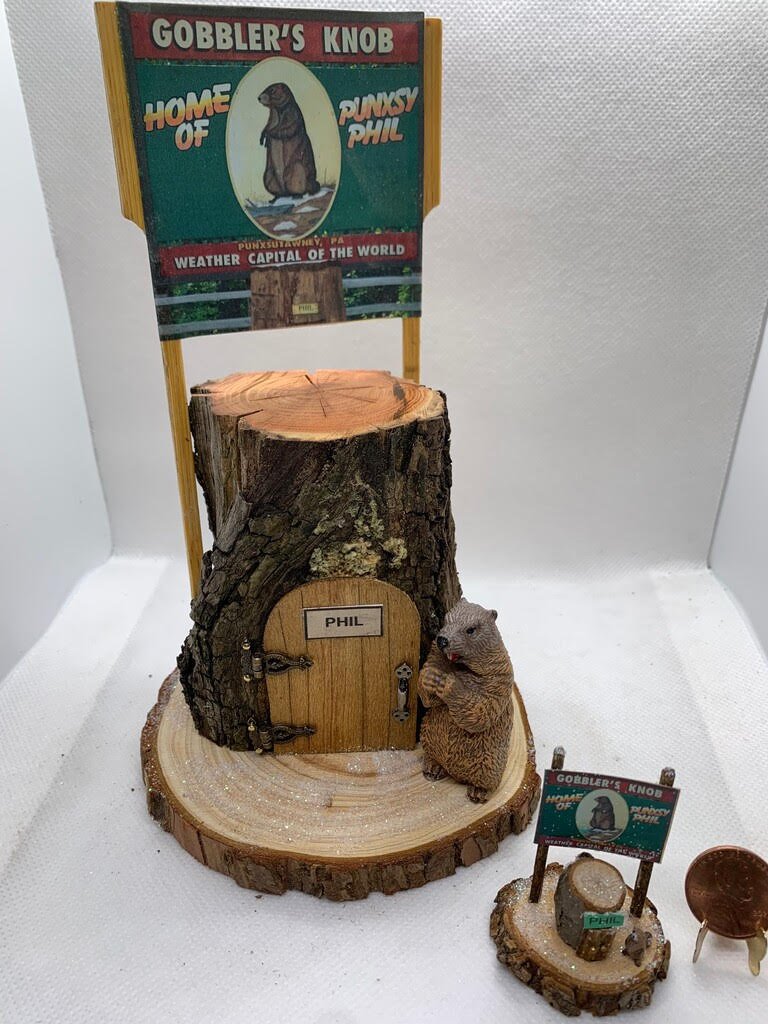
Join Barb Antol as she shows you how to make this cute little scene for Groundhog Day in 1:12, 1:24, or 1:48 scale.
CREATE is inviting you to a scheduled Zoom meeting.
Topic: Create Shares with Barb Antol-Groundhog Day
Time: Jan 10, 2026 01:00 PM Eastern Time (US and Canada)
Join Zoom Meeting
https://us06web.zoom.us/j/83434367188
Meeting ID: 834 3436 7188
Materials Needed
- Groundhog figure in desired scale
Sources:
• Blackthorn Miniatures Etsy store will have 3D printed groundhog figures in all three scales. They’re really cute and fun to paint. You can also flock them. A few years ago, I did a Create Share on flocking animal figures. If you’ve never done flocking, you can still view that video HERE.
• If you don’t want to paint and flock your groundhog figure, there are ready-made versions available:
• mini-gems.com offers a cute quarter-scale version HERE
• Happy Hen Toys offers a 2” high version which works pretty well for 1:12 scale HERE
- Stump
I used small pieces of wood logs/branches from my yard. The size can vary, but it should be roughly twice the height of your groundhog figure. It’s a good idea to sterilize the wood before using it. Simply put the wood pieces in the oven and “bake” at 250° for an hour or two. The low temperature won’t burn the wood, but it’s still a good idea to check it every 15 minutes or so.
If you don’t have access to a wood branch or log, you can find little resin stumps in various fairy garden supply stores,
Also, you can probably make a stump using a piece of cardboard tube covered with papier mache or other texture material.
- Base
I used wood slices for crafting as the base. Those slices are available from Amazon, Michaels or other craft stores and come in a variety of sizes. They’re typically 1/4-3/8” thick. For my 1:12 scale project, I used a 4.5” diameter slice and for the quarter scale version, I used a 1.5” diameter slice. Alternatively, you could use a styrofoam round, a piece of foam core or a piece of wood to
serve as the display base.
- Door
A small piece of cardboard or thin balsa wood makes a good door for the stump. You can decide if you want a rectangular or arched door, then cut the door to a size that looks good with your stump. You can stain or paint the door and add hardware if desired. For the quarter scale version, I used just a couple of small beads for door handles. For the 1:12 scale version, I used some little hinges and a door handle from my stash.
- Posts for the “Gobbler’s Knob” Sign
Toothpicks or matchsticks work well for quarter scale.
Skewers or long coffee stirrers (~7 inches) work well for 1:12 scale. Shorter coffee stirrers would work well for 1:24 scale.
You can stain or paint the posts. Optional glitter or snow.
- Glue
Tacky Glue works well for most of the project. Super glue may be needed to glue the door and posts.
- Signs
A PDF file is attached which includes sample signs for all three scales. You can print the file on regular paper or cardstock. Regular paper works fine for quarter scale, but cardstock is sturdier for 1:12 or 1:24 scale. I also recommend sealing the signs to prevent fading. I used Distress Micro Glaze by Tim Holtz, but you can use whatever sealer you normally used for paper artwork.
Instructions
1. Print the pdf file with the signs. Cut out a “Phil” sign and glue it on your door. Glue any desired hardware onto the door and let dry.
2. Glue the door onto the stump. For the 1:12 scale version, if you’ve added hinges, you may want to nail the door hinges to the stump.
3. Cut out the desired size “Gobbler’s Knob” sign and glue it to your sign support posts, then let dry.
4. Trim your post supports if needed.
5. Arrange your stump and groundhog figure on the base and determine where the support posts will go.
6. Glue the house in place and let dry. Tacky glue generally works for this step.
7. Glue the post supports for the sign in place. Super glue works better for this. For the 1:12 scale version, you might also consider drilling small holes for the sign posts to insert into. Let the posts dry completely.
8. If desired, dust the scene with glitter snow. Brush lightly with tacky glue, sprinkle on the glitter. Let dry, then shake off the excess.
9. Finally glue your groundhog figure in place by the stump and let dry.
10. Enjoy Groundhog Day!
Some Fun info About Groundhog Day
History and Facts: https://www.history.com/articles/groundhog-day-history-and-facts
https://blogs.loc.gov/folklife/2022/02/groundhog-day-ancient-origins-of…
Groundhog Rankings from NOAA: https://www.noaa.gov/heritage/stories/grading-groundhogs
The Punxsutawney Groundhog Club: The Official Website of Groundhog Day: https://www.groundhog.org/